New Tut: So Goth!
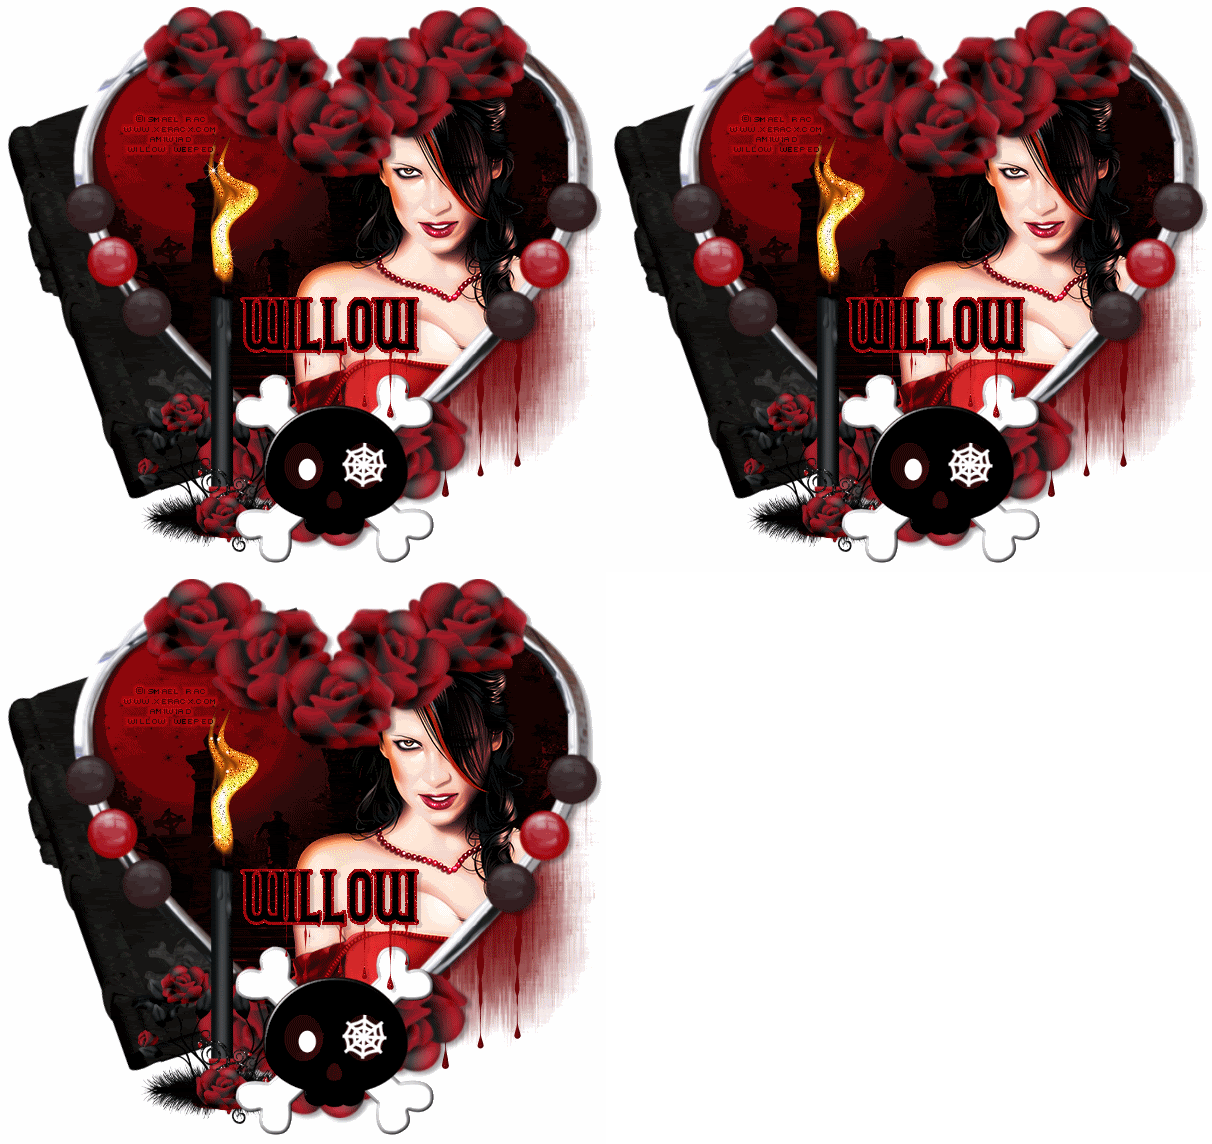
This tutorial requires basic knowledge of PSP.
This tutorial was written with PSP X2
Written by Willow May 10th 2010
This tutorial is based on a design of my own concept
and any similarities are purely coincidental.
Any supplies that are supplied from me have been made by me and may not
be used in other tutorials or offered for download any where else.
Please do NOT link to my tutorial examples, screen shots, files or graphics.
Any thing you make utilizing my tutorial is yours to do as you wish,
but you may NOT use it in any way for monitary gain.
Thank you!

SUPPLIES
The awesome scrap kit by
Kittz Kreationz, named "So Goth"
So Goth Heart2
So Goth Cute Skull
So Goth Diary
So Goth Paper3
So Goth Candle and Roses
WSL_Mask_39
Tube by the most awesome Ismael Rac. I used the Capricorn tube. You can purchase her at AMI. Please do not use his work without the proper license.
Filters I used:
Xero Radiance
Eye Candy Nature Drip
Eye Candy Nature Fire
Ok, here we go..
Open the So Goth Paper3 in PSP
Open the So Goth Heart2 in PSP, copy and paste as a new layer onto the paper, Place so the moon is at the top left of the heart, see below screen for placement.

Now choose your magic wand tool and highlight your SO Goth Heart layer, click the magic wand somewhere outside of the heart so you see your marching ants like in my screen below.

Now go to 'Selections, Modify, Expand' and expand by 4. Now highlight your paper layer and go to 'Layers, Promote Background Layer'and hit the delete key on your keyboard.
You should now be left with something like in my screen below.

Now copy your tube of choice, I copied the close up version of Ismael's Capricorn. Highlight your paper layer and paste your tube as a new layer, then mirror, and place on the right side of the frame, see my tag for example,above the paper and below your heart frame.
Now choose your magic wand tool and highlight your SO Goth Heart layer, click the magic wand somewhere outside of the heart. Now go to 'Selections, Modify, Expand' and expand by 4. Now highlight your tube layer and hit the delete key on your keyboard.
*OPTIONAL*
with the tube layer highlighted, I went to 'Effects, Plugins, Xero, Radiance' and set it to the settings in my screen below.

I also took my airbrush tool and chose a dark red color from the paper background, added a new raster layer and carefully painted the white and blue highlights in her hair to add 'warmth'. Once I had the desired areas painted, I changed the layer properties to darken. Again, this is optional. Also make sure you read the TOU for each artists as some do not allow this.
Now copy and paste your So Goth Cute Skull as a new layer, above the heart layer. Go to 'Image, Resize' and resize by 75%. (make sure 'All layers' is UNCHECKED) Place the skull in the center bottom of the heart. See my above tag for placement.
Copy and paste your So Goth Diary, as a new layer, move the layer to the bottom and go to 'Image, Free Rotate' click on Rotate Right and set it like my screen below.

Move the diary until you are happy, you can use my tag above as an example.
Now copy your So Goth Candle and Roses as a new layer, and move layer under the skull. Resize by 55%. See my tag for placement.
Now take your magic wand tool and draw a flame shape above the candle, it doesn't have to be perfect, the plugin will work with what you do =) Now go to 'Effects. plugins, eye candy, nature, fire' and set to the settings in the screen below.

Now take your lasso tool and set it to 'freehand' and draw a section to highlight areas on your tube that would be highlighted from the flame, you can see my screen below for an example.

Now go to 'selections. promote selection to layer' now that part of your tube will be it's own layer. Go to 'Adjust, Color Balance' and set to the settings in the screen below.

See...nice warmth from your flame =)
Now under your diary layer add a new raster layer and fill it with a dark red from your paper. Open your Mask in PSP and go to 'Layers, new mask layer' and find your mask in the drop down and click ok. Now adjust size and placement as you desire. I made mine a bit smaller and moved it more to the bottom right of the heart. You can see my tag for example. Right click on your mask layer and choose to merge group.
Now with that layer still highlighted, go to 'Effects, Plugins, Alien Skin, Eye Candy, Nature, Drip' and set to the settings in my screen below.

Now Open your font of choice. I used Gothicum. Foreground null, Background black. And write your name and place it above the skull.
Now take your magic wand tool and click anywhere outside of your name, go to 'Selections, Invert' then go back to 'Selections, Modify, Expand' and expand by 2. Add a new raster layer, under your name layer, and fill the selection area with the same dark red you used before. Select none.
Now with that layer still highlighted, go to 'Effects, Plugins, Alien Skin, Eye Candy, Nature, Drip' and set to the settings as before.
Now go to 'Adjust, Add/Remove Noise' and set to 50, click ok. Merge the black name layer down onto your red layer and move into place, you can see my tag for example.
Now add your copyright information. You can finish up here if you like. Make sure your background layer is hidden, if you had one and save your image as a .PNG
ANIMATION OPTIONAL:
Open Jasc Animation shop and minimize.
First thing. If you do not have a white background to your tag, add it now, under all your layers. Just add a new raster layer and fill it with white and move it below all your layers. Make sure it is visible as you copy and paste your frames into Animation shop.
Highlight your candle layer and choose your magic wand tool. Set the tolerance at around 25 and the mode to add. Start to click inside your flame so major areas of it are selected. See my screen below.

Right click on your candle layer and duplicate that layer twice so you have 3 candle layers, highlight the first one and go to 'Adjust, Add/Remove Noise' And set to 35, click ok. Now go to 'Effects, Plugins, Alien Skin, Xenofex' and set to the settings in my screen below.

Now highlight the second candle layer and go to 'Adjust, Add/Remove Noise' And set to 37, click ok. Now go to 'Effects, Plugins, Alien Skin, Xenofex' and hit 'Random Seed'.
Now highlight the third candle layer and go to 'Adjust, Add/Remove Noise' And set to 39, click ok. Now go to 'Effects, Plugins, Alien Skin, Xenofex' and hit 'Random Seed'.
Ok, now hide the top 2 candle layers and 'Copy Merged' of your tag, pull up Jasc Animation Shop and right click in the work area and 'Paste as new animation'
Go back to PSP and hide the first candle layer, unhide the 2nd candle layer and 'Copy Merged' of your tag, pull up Jasc Animation Shop and right click on the first tag you just pasted and 'Paste after current frame'
Go back to PSP and hide the 2nd candle layer, unhide the 3rd candle layer and 'Copy Merged' of your tag, pull up Jasc Animation Shop and right click on the second tag you just pasted and 'Paste after current frame'
Now right click on the first frame and choose 'Frame Properties' Change the number to 12, hit ok. Now right click on the 2nd frame and choose 'Frame Properties' and change the number to 8, click ok. Now right click the 3rd frame, choose 'Frame Properties' and change the number to 6, click ok.
Now go to 'View, Animation' and check out your work. Now you can adjust the frame properties to what you feel works better. Those where just the numbers I have mine set to.
Now go to 'File, Save as' and choose your name, saving as a .gif
And you are finished!!
Thank you so much and I hope you enjoyed this tutorial! I would love to see anything you have created with it!
This tutorial was written with PSP X2
Written by Willow May 10th 2010
This tutorial is based on a design of my own concept
and any similarities are purely coincidental.
Any supplies that are supplied from me have been made by me and may not
be used in other tutorials or offered for download any where else.
Please do NOT link to my tutorial examples, screen shots, files or graphics.
Any thing you make utilizing my tutorial is yours to do as you wish,
but you may NOT use it in any way for monitary gain.
Thank you!
SUPPLIES
The awesome scrap kit by
Kittz Kreationz, named "So Goth"
So Goth Heart2
So Goth Cute Skull
So Goth Diary
So Goth Paper3
So Goth Candle and Roses
WSL_Mask_39
Tube by the most awesome Ismael Rac. I used the Capricorn tube. You can purchase her at AMI. Please do not use his work without the proper license.
Filters I used:
Xero Radiance
Eye Candy Nature Drip
Eye Candy Nature Fire
Ok, here we go..
Open the So Goth Paper3 in PSP
Open the So Goth Heart2 in PSP, copy and paste as a new layer onto the paper, Place so the moon is at the top left of the heart, see below screen for placement.
Now choose your magic wand tool and highlight your SO Goth Heart layer, click the magic wand somewhere outside of the heart so you see your marching ants like in my screen below.
Now go to 'Selections, Modify, Expand' and expand by 4. Now highlight your paper layer and go to 'Layers, Promote Background Layer'and hit the delete key on your keyboard.
You should now be left with something like in my screen below.
Now copy your tube of choice, I copied the close up version of Ismael's Capricorn. Highlight your paper layer and paste your tube as a new layer, then mirror, and place on the right side of the frame, see my tag for example,above the paper and below your heart frame.
Now choose your magic wand tool and highlight your SO Goth Heart layer, click the magic wand somewhere outside of the heart. Now go to 'Selections, Modify, Expand' and expand by 4. Now highlight your tube layer and hit the delete key on your keyboard.
*OPTIONAL*
with the tube layer highlighted, I went to 'Effects, Plugins, Xero, Radiance' and set it to the settings in my screen below.
I also took my airbrush tool and chose a dark red color from the paper background, added a new raster layer and carefully painted the white and blue highlights in her hair to add 'warmth'. Once I had the desired areas painted, I changed the layer properties to darken. Again, this is optional. Also make sure you read the TOU for each artists as some do not allow this.
Now copy and paste your So Goth Cute Skull as a new layer, above the heart layer. Go to 'Image, Resize' and resize by 75%. (make sure 'All layers' is UNCHECKED) Place the skull in the center bottom of the heart. See my above tag for placement.
Copy and paste your So Goth Diary, as a new layer, move the layer to the bottom and go to 'Image, Free Rotate' click on Rotate Right and set it like my screen below.
Move the diary until you are happy, you can use my tag above as an example.
Now copy your So Goth Candle and Roses as a new layer, and move layer under the skull. Resize by 55%. See my tag for placement.
Now take your magic wand tool and draw a flame shape above the candle, it doesn't have to be perfect, the plugin will work with what you do =) Now go to 'Effects. plugins, eye candy, nature, fire' and set to the settings in the screen below.
Now take your lasso tool and set it to 'freehand' and draw a section to highlight areas on your tube that would be highlighted from the flame, you can see my screen below for an example.
Now go to 'selections. promote selection to layer' now that part of your tube will be it's own layer. Go to 'Adjust, Color Balance' and set to the settings in the screen below.
See...nice warmth from your flame =)
Now under your diary layer add a new raster layer and fill it with a dark red from your paper. Open your Mask in PSP and go to 'Layers, new mask layer' and find your mask in the drop down and click ok. Now adjust size and placement as you desire. I made mine a bit smaller and moved it more to the bottom right of the heart. You can see my tag for example. Right click on your mask layer and choose to merge group.
Now with that layer still highlighted, go to 'Effects, Plugins, Alien Skin, Eye Candy, Nature, Drip' and set to the settings in my screen below.
Now Open your font of choice. I used Gothicum. Foreground null, Background black. And write your name and place it above the skull.
Now take your magic wand tool and click anywhere outside of your name, go to 'Selections, Invert' then go back to 'Selections, Modify, Expand' and expand by 2. Add a new raster layer, under your name layer, and fill the selection area with the same dark red you used before. Select none.
Now with that layer still highlighted, go to 'Effects, Plugins, Alien Skin, Eye Candy, Nature, Drip' and set to the settings as before.
Now go to 'Adjust, Add/Remove Noise' and set to 50, click ok. Merge the black name layer down onto your red layer and move into place, you can see my tag for example.
Now add your copyright information. You can finish up here if you like. Make sure your background layer is hidden, if you had one and save your image as a .PNG
ANIMATION OPTIONAL:
Open Jasc Animation shop and minimize.
First thing. If you do not have a white background to your tag, add it now, under all your layers. Just add a new raster layer and fill it with white and move it below all your layers. Make sure it is visible as you copy and paste your frames into Animation shop.
Highlight your candle layer and choose your magic wand tool. Set the tolerance at around 25 and the mode to add. Start to click inside your flame so major areas of it are selected. See my screen below.
Right click on your candle layer and duplicate that layer twice so you have 3 candle layers, highlight the first one and go to 'Adjust, Add/Remove Noise' And set to 35, click ok. Now go to 'Effects, Plugins, Alien Skin, Xenofex' and set to the settings in my screen below.
Now highlight the second candle layer and go to 'Adjust, Add/Remove Noise' And set to 37, click ok. Now go to 'Effects, Plugins, Alien Skin, Xenofex' and hit 'Random Seed'.
Now highlight the third candle layer and go to 'Adjust, Add/Remove Noise' And set to 39, click ok. Now go to 'Effects, Plugins, Alien Skin, Xenofex' and hit 'Random Seed'.
Ok, now hide the top 2 candle layers and 'Copy Merged' of your tag, pull up Jasc Animation Shop and right click in the work area and 'Paste as new animation'
Go back to PSP and hide the first candle layer, unhide the 2nd candle layer and 'Copy Merged' of your tag, pull up Jasc Animation Shop and right click on the first tag you just pasted and 'Paste after current frame'
Go back to PSP and hide the 2nd candle layer, unhide the 3rd candle layer and 'Copy Merged' of your tag, pull up Jasc Animation Shop and right click on the second tag you just pasted and 'Paste after current frame'
Now right click on the first frame and choose 'Frame Properties' Change the number to 12, hit ok. Now right click on the 2nd frame and choose 'Frame Properties' and change the number to 8, click ok. Now right click the 3rd frame, choose 'Frame Properties' and change the number to 6, click ok.
Now go to 'View, Animation' and check out your work. Now you can adjust the frame properties to what you feel works better. Those where just the numbers I have mine set to.
Now go to 'File, Save as' and choose your name, saving as a .gif
And you are finished!!
Thank you so much and I hope you enjoyed this tutorial! I would love to see anything you have created with it!


Read Users' Comments (0)