Merry XXXMas!


This tutorial requires basic knowledge of PSP and Animation shop.

This tutorial was written with PSP X2
Written by Willow November 10th 2009
This tutorial is based on a design of my own concept and
any similarities are purely coincidental.

Any supplies that are supplied from me have been made by me and may not

be used in other tutorials or offered for download any where else.

Please do NOT link to my tutorial examples, screen shots, files or graphics.

Thank you!

SUPPLIES

Tube Art Copyright Ismael Rac, you can purchase it at AMI

Other supplies by me, you can download it HERE

FONT USED

Champagne & Limosuines

SCRAPS

PimpD Designs (the bow)

Ok, let's get started.

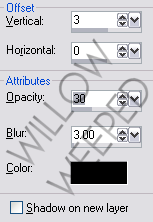
Drop shadow settings I used for this tag:


Open your supplies in PSP and minimize

Start a new image 560 x 560 pixels

Flood fill white

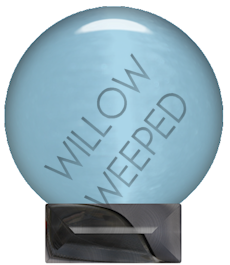
Copy the snow globe and paste onto your blank canvas as a new layer

Copy your blue circle and paste as a new layer on your blank canvas and align it so it is lined up with the glass ball of your snow globe then move the circle layer under your snow globe layer, see screen shot for example..


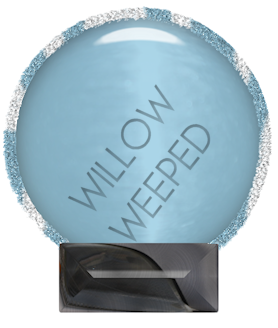
Copy your fur frame and paste as a new layer above the snow globe, align it with the globe, see screen shot for example..


Copy and paste your tube of choice and resize 80%
(make sure the "all layers' is UNCHECKED)
Add drop shadow as specified above.

Place the tube how you would like it to be seen under the glass of the globe

Now highlight the blue circle layer and go to selections, select all, float, defloat, invert

Highlight your tube layer and hit delete on your keyboard

Now highlight the blue circle layer again

Here is where I added my snow,
You can open your animated snow in animation shop and click edit, select all then copy. Go back to your psp and paste the file into your psp. You will see all the layers in the one image. You can go layer by layer and copy and paste them each as new layers into your globe (note: make sure that the snow image size is big enough to fill your whole globe) Once you have all layers of snow pasted, highlight the blue circle again and click selections, select all, float, defloat, invert Highlight each snow layer and hit delete on your keyboard to remove any snow outside your globe.

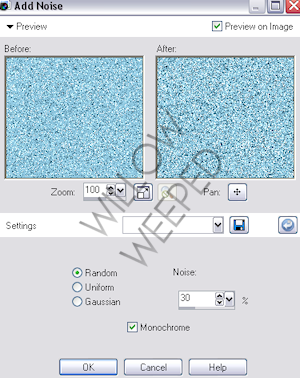
Now, if you don't have snow or if that is too much, you can always duplicate the blue circle layer 3 times and choose: adjust, add/remove noise and on each blue circle layer, just change the noise level a bit. See screen shot to see how I set the first time, the second and third layer my noise level changed to 35 and 40.


Now for your name

Choose your font tool and find your preferred font and set your size...mine is set at 14

foreground: null
Background: #a51705

Type out your name and click apply

Change layer to raster layer and position where you want it on the globe base.

Add/Remove noise to name layer on the same settings as before but leave the noise level on 30.

Click selections, select all, float, defloat, modify, expand and expand it by 3

Start a new raster layer and flood fill in the selection on that new layer, with white.

Move the white layer below your name layer and merge your name layer down onto the white layer.

Change the layer properties to luminance.

Duplicate this layer

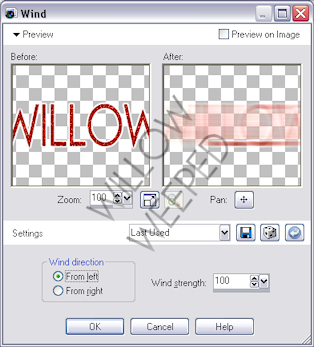
Go to effects, distortion, wind

See screen shot for wind settings.


Move the wind layer below your other name layer

Now take your ribbon of choice and paste it as a new layer above your globe and place it where the globe and base meet. Add drop shadow as specified above.

Add your copyright information

Crop the image how you want it, be careful not to crop anything off.

ANIMATION

Open animation shop

Hide the white layer and all your snow or noise layers.

Unhide your first snow or noise layer and copy merged

Go to animation shop and right click and choose "paste as new animation"

Go back to your psp and unhide your second snow/noise layer and copy merged

Go to animation shop and right click and choose "paste after current frame"

Continue this process until your have all your snow/noise layers in your animation shop.

Now view animation to make sure you like it and then save as a .gif

Thank you!

  • Digg
  • Del.icio.us
  • StumbleUpon
  • Reddit
  • Twitter
  • RSS

Living Dead Girl


This tutorial requires basic knowledge of PSP and Animation shop.

This tutorial was written with PSP X2

Written by Willow September 22nd 2009

This tutorial is based on a design of my own concept and

any similarities are purely coincidental.

Any supplies that are supplied from me have been made by me and may not

be used in other tutorials or offered for download any where else.

Please do NOT link to my tutorial examples, screen shots, files or
graphics.


Thank you!


SUPPLIES

Tube Art Copyright Ismael Rac, you can purchase it at
AMI

Mask by Vaybs, you can download it
HERE

Quote on the moon by me. You can download that
HERE


FILTERS USED

Xenofex-Constellation (optional)

Eye Candy-Extrude (optional)

Xero-Radiance (optional)

Xero-Greyscaler (optional)

FONT USED

Luciferius

SCRAPS

Lacarolita-Scream at the Night. You can download that
HERE


Ok, let's get started!

Shadow setting I used for any shadows is..


Open your mask and Resize-Canvas size 900x900

Paste tube and place in left side of mask, to liking

Highlight mask layer

Click the inside black part of the mask with the magic wand

Invert

Highlight tube layer

Erase the bottom of her legs

Select none

Duplicate tube layer

Xero radiance on top tube layer to these settings
(if you do not have
Xero-radiance then skip to the step of highlighting the mask layer.)


Lower opacity of top tube layer to 55

Merge top tube layer to bottom tube layer

Highlight mask layer again

Click the inside black part of the mask with the magic wand

Paste close up of tube and place to the right of the mask, to liking

Invert

Hit delete

Xero-greyscaler to the following settings


If you do not have greyscaler then just use ADJUST-HUE and SATURATION

with both sliders on "0"

Lower opacity to 25

Open the Lacarolita_Scream at the Night Gate

Copy and paste onto your image

Resize 50%

See my example for placement.

Open the Lacarolita_Scream at the Night Moon

Resize by 50% and place in top right corner

See my example for placement.

Open the Lacarolita_Scream at the Night Crow1

Resize by 50% and place on the fence post by moon

See my example for placement.

Open the Lacarolita_Scream at the Night Lighting

Resize by 50%

See my example for placement.

Duplicate the lightening

Mirror

Opacity 25% and move behind the main tube

Open my quote and place over moon

Change layer settings to burn

Open your Luciferius font

Choose your font tool and find Luciferius in your font list

Size 72

Type out "Living Dead Girl" or words of your choice

Right click on your font layer in your layer palette and convert to
raster layer

Selections-Select All-Float-Defloat

Selections-Modify-Expand-3

New raster layer

Fill with #c0c0c0

Adjust-Add/Remove noise, settings on "random-monochrome-100"

Move colored noise layer under the "Living Dead Girl" text

Merge text down onto colored noise layer

Eye Candy-Extrude on these settings


Open the Lacarolita_Scream at the Night Spider1

Resize by 50% 2 times.

See my example for placement.

Now make sure to add your Copyright and Name


(for my name and copyright I used Image-Free Rotate and 90 degrees)

Choose your selection tool,
set on rectangle and select completely
around your image,
don't cut anything off,
and choose Image-Crop
to selection.

ANIMATION

Duplicate the top lightening bolt 2 times, making a total of 3
lightening layers

Highlight the first one and use

Add/Remove Noise, settings on "random-monochrome-30"

Xenofex-Constellation, on the settings shown below
(if you don't
have constellation then just do the Add/Remove Noise steps.)


Highlight the second lightening bolt layer and

Add/Remove Noise, settings on "random-monochrome-35"

Xenofex-Constellation again, don't change anything but click the "Random
Seed" once

Highlight the third lightening bolt layer and

Add/Remove Noise, settings on "random-monochrome-40"

Xenofex-Constellation again, don't change anything but click the "Random
Seed" once

OPEN ANIMATION SHOP

In PSP hide the top 2 lightening layers then "COPY MERGED" on your image

Go into Animation shop and PASTE as NEW animation
Back in PSP hide the first lightening layer, unhide the 2nd one and
again

"COPY MERGED"

In Animation shop, paste after current frame

Back in PSP hide the 2nd lightening layer, unhide the 3rd one and again

"COPY MERGED"

In Animation shop, paste after current frame

In Animation shop choose Edit-Select all

Choose Animation-Frame Properties

Change number to 17

File-SAVE AS...

There ya go!! Happy Tagging!!!


  • Digg
  • Del.icio.us
  • StumbleUpon
  • Reddit
  • Twitter
  • RSS